Using Data Mover Sync
The Sync enables you to improve and automate backup performance reliably. The smart file system scanning technique detects the new or modified files that help to validate the metadata. During the sync process, scanning and data upload to Lyve Cloud run parallel. Data Mover sync can be automatic or manual. Once the Data Mover set up is complete, auto-sync of the data starts without any user intervention, where the task runs at five minute of intervals. Using the following options, you can create a manual sync for historical data from the local system to the cloud.
By Folder: Sync data of a specific folder to the cloud.
By Day: Sync data based on the last modified date of the file. For example, if you want to sync data for one day, it will restore data from the previous day to the current system time.
By Range: Sync data based on the last modified date of the folder.
For example, if you select the range from 06-Jun-2022 to 07-Jun-2022, in that case, the data is synced from 06-Jun-2022 00:00:01 to 07-Jun 23:59:59.
All: Sync all the data from the cloud.
During the sync, the status can show as follows:
Ready: Sync task is ready after creation.
Scanning: Sync task is scanning the folder/file based on the sync task.
Syncing: Sync task is detecting new/modified files awaiting upload to the cloud.
Uploading: Sync task is uploading to the cloud.
Completed: Sync task is complete, and all files are uploaded to the cloud.
You can pause, resume, or cancel the data sync once the data starts syncing.
You can view and download the synced data from the Data Mover Browser. You can download the up to a maximum of 5GB of sync data using the browser.
Columns Name | Description |
|---|---|
Data Mover | Displays the Data Mover name. |
Type | Displays the type of sync. It can be either Manual or auto. |
Status | Displays the status of the sync task. |
Sync Option | Displays the selected sync option. The sync option can be by folder, day, range, or all. |
Folder | Displays the folder that is synced. It also shows the folder path. |
Total File Sync | Displays the total new or modified files awaiting upload to the cloud after scan. |
Total File Sync Size | Displays the total new or modified files size upload to the cloud. |
Total File Scan | Displays the total files scanned from the data source path. |
Queue | Displays the queue in the staging area, pending files upload to the cloud. |
Sync Date Range | Displays the date range of the sync. Initially, the sync date is the day after the Data Mover installation and setup is completed. |
Last Sync Date | Displays the last sync date of the Data Mover. |
Description | Displays the description when you create a manual sync. |
Update Time | Displays the last updated time after any action is performed. |
Action | Displays various actions that can be performed during data sync, such as pause/resume/cancel. In the case of Auto sync, there is no action required. |
Creating Manual Sync task
Manual sync can be created as a one-time time data sync task for the archived file system.
After the manual sync task is created, it is displayed in the sync list. Once the sync starts, it displays the following statuses:
Ready: Sync task is ready after creation.
Scanning: Sync task scans the folder/file based on the sync task.
Syncing: Sync task detected new/modified files awaiting upload to the cloud
Uploading: Sync task is uploading to the cloud.
Completed: Sync task is completed, and all files are uploaded to the cloud.
After the sync is completed, you can view the details on the list page:
On the left-hand menu, select Data Mover and then select Sync.
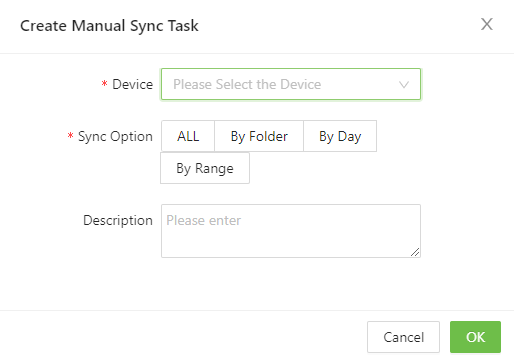
On the sync page, select Create Manual Sync Task.
Enter the following:
Device: Select the device from the list to sync.
Sync Option: You can select sync by Folder, Day, Range or All.
Select Folder and enter the Folder name.
Select By Day and enter the number of days to sync data.
Select Sync Range, enter the start and end date to sync the data.
Description: Enter the description of the sync task.
You can interrupt the sync task by performing the following actions:
Pause: Sync task is temporarily paused.
Resume: Sync task can resume after it is paused.
Cancel: Sync task is cancelled if not required, and it cannot be resumed after it is cancelled.
Creating Auto Sync task
You can create an automatic sync task for data sync of the online file system that requires updates of new/modified files. After the auto sync is enabled, Data Mover scans the data source path in a five minutes intervals. If any new data is updated or modified, then this data is synced to Lyve Cloud.
You must enable the Sync Mode to Auto in the Data Mover Settings. For more information, see Updating Data Mover settings.