Managing Data Mover
After successfully completing the installation, you can set up the Data Mover.
Create a plan for a new Lyve Cloud Data Mover Worker with the required information for setup.
Using the same Data Mover Portal, you can add multiple backup and restoration instances on the Data Mover Worker node.
Plan for new Lyve Cloud Data Mover Worker intake with the required information for setup.
Use the same Data Mover Portal, Browser and database.
Add a new Data Mover
Option 1: Provision another Data Mover server
Either clone from the existing Data Mover server or set up a new Data Mover server.
Setup new Data Mover Server based on the Lyve Data Mover Installation Guide.
Option 2 – Leverage existing Data Mover server
Set up a new Data Mover Worker based on the Lyve Data Mover Installation Guide.
Input another Data Mover name with a new data source and data destination.
Monitor and ensure sufficient system resources to support the additional load
Access Data Mover Browser on the web using the http://PORTALHOSTNAME:PortNumber/login.
Enter the default username and password to log in.
Note
If the portal hostname is not available, replace it with IP Address where the default Port Number is 8443.
Use HTTPS instead of HTTP if SSL is enabled.
Select Home and then select Setup from the menu.
In the Configuration information, enter the following details, and select Submit.
Note
Some Information for the Portal IP address or hostname is automatically populated. Also, ensure the hostname is in the FQDN convention.
Section
Field Name
Description
Config Basic Information
Data Mover Name
Specify the Data Mover name and cannot contain spaces
Data Mover Worker IP/Hostname (FQDN)
Specifies the Data Mover Name. This name is the same when you configure it in Data Mover Setting.
File Access Port
Specify the port number of the data mover. Port number is 8080
Enable HTTPS
Use the toggle to enable or disable HTTPS. You can enable HTTPS when you install SSL certificate for Data Mover.
Comments
Add comments for Data Mover device.
Data Path Configuration
Data Source Path
Specifies the On-prem NAS path for data upload to Cloud.
Data Restore Path
Specifies On-prem NAS restore path for data restores from Cloud.
Note
The restore path cannot be the same as Data Source Path.
Lyve Cloud configuration or Lyve Cloud storage details
Access Key
Enter your access key. The access key displays when creating a new service account in Lyve Cloud. A service account contains the bucket credentials for the Lyve Cloud bucket.
For more information, see Creating service accounts.
Secret Key
Enter your secret key. The secret key is displayed when creating a new service account in Lyve Cloud.
For more information, see Creating service accounts.
Endpoint
Enter Lyve Cloud S3 endpoint. For more information, see the S3 API endpoints.
Currently, Lyve Cloud supports only region-specific S3 endpoints. To access buckets created in different regions in the S3 client, add an endpoint connection for each region.
Bucket Name
Specify the Lyve Cloud bucket name to move the data from on-prem.
Description
Specify the description of the data configuration.
Select Submit to create a new Data Mover.
Editing a Data Mover device
The Data Mover settings are already updated in the Data Mover portal once the installation and setup are completed. For more information, see Installing Data Mover Portal and Data Mover Worker and Setting up Data Mover.
You can search the Data Mover using the search filter, and edit the device settings if required.
The following table describes the column information for devices:
Column Name | Description |
|---|---|
Device Name | Displays the Data Mover Name. This name is the same when you configure it in Data Mover Settings. |
IP/Hostname | Displays the Data Mover Server IP or Host Name. |
Comments | Enter any additional details during the set up. |
Status | Specifies the current status of the device. It shows if the device is running or stopped. |
HTTPS | The HTTPS is Disabled when SSL is not enabled. The HTTPS is Enabled when the SSL is enabled with HTTPS for Data Mover Server and Data Portal Server. |
Create Time | Displays the configuration update time. |
Action | Displays the actions that can be performed. You can edit the device settings using the Edit option. |
On the left-hand menu, select Data Mover and then select Device.
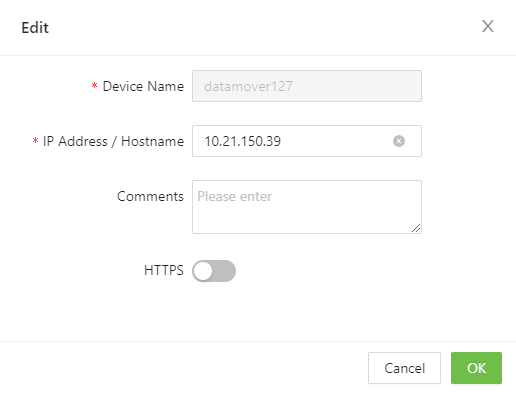
In the Actions column, select Edit.
Edit the following
Device Name
IP Address/Hostname: Specifies the IP/hostname of the Portal server
Https: If SSL certification is applied to the Portal server, enable HTTPS.
Interrupting the Data Mover
You can interrupt the status of the Data Mover from a Running state to Stop and Restart. After you Stop the service, you can Resume the service.
On the left-hand menu, select Data Mover, and then select Device.
Select Stop or Restart from the actions column.
Deleting Data Mover
On the left-hand menu, select Data Mover and then select Settings.
In the Actions column, select Delete.
Select OK in the confirmation box.