Restoring Data
You need to allocate sufficient on-premises storage capacity space for data restoration.
Creating a restore task
Restoring a task allows you to restore the data from the cloud to on-premises. Restoration helps to provide high availability of data hence you can restore this data whenever required after the storage failure.
You can restore a task by day, folder, range, or all.
By Folder: Restores data from the specific folder or files from the cloud.
By Day: Restore data based on the file's last modified date. For example, if you want to restore data for one day, it will restore data from the previous day to the current system time.
By Range: Restore data based on the last modified date of the file.
For example, if you select the range from 06-Jun-2022 to 07-Jun-2022, in that case, the data is restored from 06-Jun-2022 00:00:01 to 07-Jun 00:00:00.
All: Restores all the data from the cloud
On the left-hand menu, select Data Mover, and then select Restore.
On the Restore page, column select Create Restore Task.
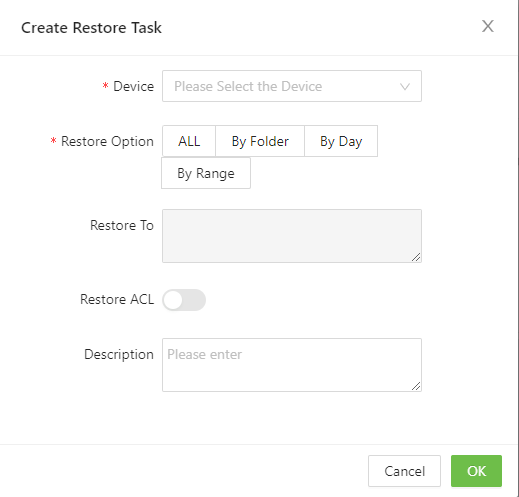
Enter the following information and select OK.
Device: Specify the device name.
Restore Option: Select if you want to restore from a particular folder by day, range, or range.
Restore To: Specify the on-premises location to restore the data. By default, the data is restored in the path specified during the Data Mover setup. This field cannot be edited.
Restore ACL: It allows you to restore data from Lyve Cloud with its original permission, the same as file permissions at the source path. You can enable Restore ACL from the Data Mover setting section. For more information, see Updating Data Mover settings.
Description: Specify any details for the restore.
Interrupting the restore task
You can interrupt the restore task during the process. You can pause, resume, or cancel the restore task.
Pause: Restore task is temporarily pauses or stops.
Resume : Restore task resumes after it is paused.
Cancel: Restore task is cancelled.
Delete: Restore task is deleted after it is completed or cancelled.
During the restore, you can view the status of the task:
Ready: The restore task is ready to execute after it is created.
Completed: The restore task is completed after the folder/files are downloaded.
Crunching: The restore task is scanning the folder/file base on restore criteria.
Resume: The restore task can resume after it is paused.
Downloading: The restore task is downloading to folder/files to on-premises storage based on the data restore path.
Restoring ACL: When enabled, the restore task will restore ACL information with its set permission to the folder/files (source path).
Completed: The restore task is completed after the folder/files are downloaded.
Exception error: The restore task encounters data restore issues; refer to Running Log for details.
Once the restore task is created, you can view the task in the restore task list.
Column Name | Description |
|---|---|
Data Mover | Displays the Data Mover name. |
Status | Displays the status of the restore task. |
Restore ACL | Displays if the restore ACL is enabled or disabled for the task. |
Criteria | Displays the criteria for the restore option. Criteria for the restore option can be By Folder, By Day, By Range, and All. |
Total Files | Displays the total file size of the restore. |
Total File Size | Displays the total file size. |
Folder Name | Displays the folder name from where the data is restored. |
Restore Queue | Displays the number of files that are in the queue to be restored. |
Description | Displays the description or additional information mentioned for the restore task. |
Update Time | Displays the last updated time of the restore task. |
Action | The action column has different actions that can be performed to the restore task, like Pause, Resume, Cancel, and Delete. |
On the left-hand menu, select Data Mover, and then select Restore.
In the Actions column, select Pause or Cancel.
If you have already Paused the restore task, the Resume option is displayed to continue with the restore task.
Select Ok to confirm the action.