Lyve Cloud with BorgBackup
This guide will teach you how to deploy and perform data backups on Lyve Cloud with BorgBackup.
The following prerequisites are required before installing BorgBackup.
A Lyve Cloud storage account
Permission with all operations
Install BorgBackup using YUM install for RHEL/CentOS
Install restic on CentOS
The configuration for Lyve Cloud with BorgBackup is divided into three simple tasks.
Create a Lyve Cloud Service Account. For more information, see Provisioning Storage Buckets.
Installing and initializing BogBackup to Lyve Cloud.
Executing backups to Lyve Cloud using Restic.
Installing BorgBackup and Restic
Note
The following instructions are tested using BorgBackup version 1.1.18 and CentOS Linux release 7.9.2009 (Core), and Restic 0.13.1 compiled with go1.18 on Linux/amd64.
Install BorgBackup using YUM install for RHEL/CentOS on CentOS.
Open a shell prompt.
Run the command to install epel repository.
yum install epel-releaseRun the following command to install BorgBackup.
yum install borgbackup
Install Restic on CentOS
Run the command to install the
yum-plugin-coprrpm package.yum install yum-plugin-coprInstall restic via copr repository.
yum copr enable copart/resticyum install restic
Initializing BorgBackup
Run the borg init command with your repository file path to initialize the file space.
In this example, the file path is /home/admin/borg-repo.
borg init --encryption=repokey /home/admin/borg-repoCreate a new passphrase to access your repository.
Note
To access the repository, you need to enter the passphrase.
Enter your new passphrase.
Enter new passphrase:
Re-enter your passphrase to confirm.
Enter same passphrase again:
Type Y to display your passphrase
Do you want your passphrase to be displayed for verification? [yN] : y
The following is the output, where your passphrase is displayed.
Your passphrase (between double quotes) : For example123.
Make sure the passphrase displayed above is exactly what you wanted.
By default, repositories initialized with this version produces security errors if written with an older version (up to and including Borg 1.0.8).
If you want to use these older versions, you can disable the check by running:
borg upgrade --disable-tam /home/admin/borg-repo
See https://borgbackup.readthedocs.io/en/stable/changes.html#pre-1-0-9-mmanifest-spoofing-vulnerability for details about the security implications.
Important
You will need both KEY AND PASSPHRASE to access the repo.
If you used a repo key mode, the key is stored in the repo, but you should back it up separately.
Optionally, use “borg key export” to export the key in printable format. Write down the passphrase. Store both at a safe place(s).
Using BorgBackup
Use the following procedure for new and incremental backups.
Run the create command to create a backup in the Borg repository.
The following example creates a backup to the borg repository called Thursday of files borg-scr and borg-src-2.
borg create –stats /path/to/source-folder::new-borg-repo-name path/to/borg-repo-destinationborg create --stats /home/admin/borg-repo::Thursday /home/admin/borg-src /home/admin/borg-src-2Enter your passphrase to view your repository’s archival history with data including Archive fingerprint, start time, end time, and more.
Enter passphrase for key /home/admin/borg-repo:
------------------------------------------------------------------------
Archive name: Thursday

Time (start) : Thu, 2022-06-02 06:20:40Time (start): Thu, 2022-06-02 06:20:40

Time (end) : Thu, 2022-06-02 06:20:40

Duration: 0.02 seconds

Number of files: 2

Utilization of max. archive size: 0%

------------------------------------------------------------------------

               Original size     Compressed size     Deduplicated size

This archive:     1.42 kB          1.07kB              1.07kB

All archives:     1.42 kB          1.07kB              1.07 kB

               Unique chunks    Total chunks

Chunk index:         4               4
Use the command borg list and enter your repository file path to list all archives in the repository.
borg list /home/admin/borg-repoEnter your passphrase to access your repository.
In this example, we see a list of our single archive titled Thursday with the archive date and fingerprint.
Enter passphrase for key /home/admin/borg-repo:Thursday Thu, 2022-06-02 06:20:40 [Archive fingerprint]
To list the contents of an archive, use the command borg list, enter your repository file path, and :Your_archive_name.
This example lists the contents of the Thursday archive.
borg list /home/admin/borg-repo::ThursdayEnter your passphrase to access the repository.
Enter passphrase for key /home/admin/borg-repo:

drwxr-xr-x root   root         0 Thu, 2022-06-02 06:08:05 home/admin/borg-src

-rw-r—r--  root   root         24 Thu, 2022-06-02 06:08:05 home/admin/borg-src/file1.txt

drwxr-xr-x root   root         0  Thu, 2022-06-02 06:08:58 home/admin/borg-src-2

-rw-r—r--  root   root        25  Thu, 2022-06-02 06:08:58 home/admin/borg-scr-2/file2.txt
Initializing Restic
The following instructions are intended for Restic and BorgBackup only. These commands have not been tested on similar tools.
Open Terminal and enter your Lyve Cloud Access Key and Secret Key ID. For more information, see Creating a service account.
export AWS_ACCESS_KEY_ID=<access key>export AWS_ACCESS_KEY_ID=<access key>
export AWS_SECRET_ACCESS_KEY=<Secret key>
Initializing the Restic repository.
Enter your Lyve Cloud bucket endpoint URL and create a password for your Restic repository.
restic -r s3:https://s3.us-west-1.lyvecloud.seagate.com/borg-restic-bkt init
Create a new password to access your repository.
enter password for new repository:
Re-enter the password to access your repository.
enter the password again:enter password again:
Once the password is successfully created, the repository is created.
created restic repository fc56337ecc at s3:https://s3.us-west-1.lyvecloud.seagate.com/borg-restic-bkt
Please note that knowledge of your password is required to access the repository. Losing your password means that your data is irrecoverably lost.
Using Restic with BorgBackup
To perform your backup with Restic, enter your bucket endpoint URL followed by the verbose backup command and repository file path, as shown in the example below:
restic -r s3:https://s3.us-west-1.lyvecloud.seagate.com/borg-restic-bkt --verbose backup /home/admin/borg-repo
Open and enter your password to access the restic repository.
open repositoryenter password for repository:The output is shown as follows
Files: 10 new, 0 changed, 0 unmodified
Dirs: 5 new, 0 changes, 0 unmodified
Data Blobs: 8 new
Tree Blobs: 6 new
Added to the repo: 49.873 KiB
processed 10 files, 43.127 KiB in 0:02
snapshot ddf98cf6 saved
To list all snapshots, enter your bucket endpoint URL followed by the snapshots command.
restic -r s3:https://s3.us-west-1.lyvecloud.seagate.com/borg-restic-bkt snapshots
Enter your password.
enter password for repository:
The output will display as shown.
ID Time Host Tags Paths
--------------------------------------------------------------------------------------------------------------------------------
ddf98cf6 2022-06-02 08:35:41 admin-centos.symphony.local /home/admin/borg-repo
----------------------------------------------------------------------------------------- --------------------------------
1 snapshots
Enter your bucket endpoint URL, restore (snapshot ID), and set the target location for your local machine.
The following example shows as seen in the example below:
restic -r s3:https://s3.us-west-1.lyvecloud.seagate.com/borg-restic-bkt restore ddf98cf6 --target ./borg-restic-restore
Enter your password.
enter password for repository:
The output will display as shown below:
repository fc56337e opened successfully, password is correctrestoring <Snapshot ddf98cf6 of [/home/admin/borg-repo] at 2022-06-02 08:35:41.456400179 +0000 UTC by root@admin-centos.symphony.local >to ./borg-restic-restoreRun the listcommand followed by the restore file path to list the contents of the archive downloaded from Lyve Cloud.
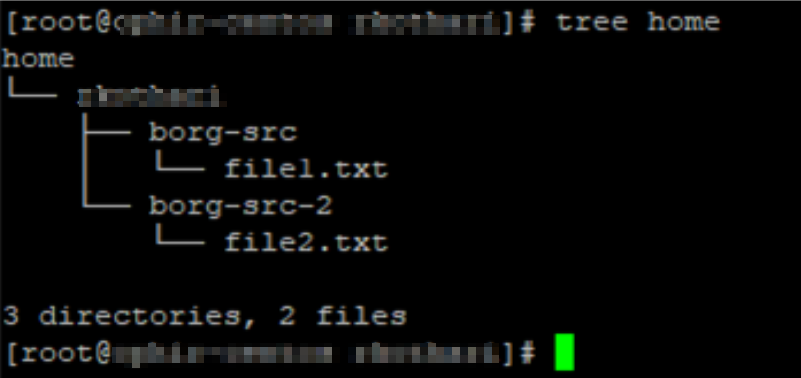
borg list /home/admin/borg-restic-restore/home/admin/borg-repo/
The output will display as shown below:
Thursday Thu, 2022-06-02 06:20:40 [Archive fingerprint]Run the extract command followed by the borg repository file path and archival name to restore the borg repository downloaded from the cloud.
borg extract /home/admin/borg-restic-restore/home/admin/borg-repo/::Thursday
Enter your password for the borg repository.
Enter passphrase for key /home/admin/borg-restic-restore/home/admin/borg-repo:
The image displays as:
The snapshot in the example above is removed, but the data that was referenced by files in this snapshot is still stored in the repository. To clean up unreferenced data, the prune command must be used.
Run the delete command followed by the borg file path and archive name to recover disk space by manually deleting the archive on the local machine.
borg delete /home/admin/borg-restic-restore/home/admin/borg-repo/::ThursdayEnter your passphrase to confirm the deletion.
Enter passphrase for key /home/admin/borg-restic-restore/home/admin/borg-repo: XXXTo delete a snapshot from the restic repository in the cloud, use the following command and specify the snapshot ID to be removed.
restic -r s3.endpoint.URL/target-bucket forget snapshot ID
In this example, we are deleting snapshot f8a6becd from the restic-new-bkt in Lyve Cloud.
restic -r s3:https://s3.us-west-1.lyvecloud.seagate.com/restic-new-bkt forget f8a6becd
Enter the password for the repository.
In the output below, snapshot ID, f8a6becd, has been deleted from the 99eb2711 repository.
enter password for repository:Repository 99eb2711 opened successfully, password is correct(0:00) 100.00% 1/1 files deleted...Cleaning up unreferenced data
The snapshot in the example above is removed, but the data that was referenced by files in this snapshot is still stored in the repository. To clean up unreferenced data, the prune command must be used.
Use the following command to clean up snapshots of unreferenced data that is still stored in the repository.
restic -r s3.endpoint/restic-repo-bkt prunerestic -r s3:https://s3.us-west-1.lyvecloud.seagate.com/restic-new-bkt prune enter password for repository: Repository 99eb2711 opened successfully, password is correct Loading indexes… Loading all snapshots… Finding data that is still in use for 1 snapshots [0:00] 100.00 % 1 / 1 snapshots… (snip) Deleting obsolete index files [0:00] 100.00% 3 / 3 files deleted… Removing 3 old packs [0:00] 100.00% 3 / 3 files deleted…