Configuring settings
After the Data Mover installation and setup are completed, you can edit the settings.
Updating Data Mover settings
The Data Mover settings are available once the installation and setup are completed. For more information, see Installing the Data Mover Portal.
On the left-hand menu, select Data Mover and then select Settings.
In the Actions column, select Settings.
Edit the following information and select OK.
Note
Use the Upload and Sync Threads parameters to balance the NAS file system scan, sync and upload.
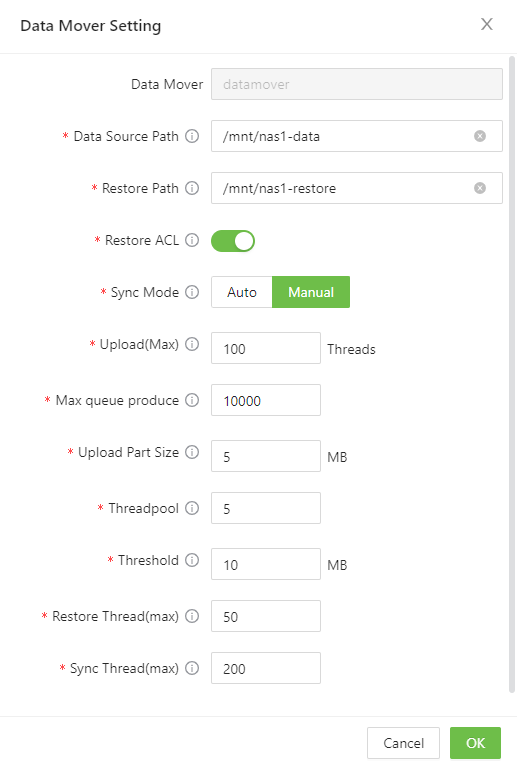
Field Name
Description
Data Mover
Specifies the name of the Data Mover.
Data Source Path
Specifies the on-prem mounting NAS exported directory as data source path to sync data to Cloud
Restore Path
Specifies the on-prem mounting NAS exported directory as data restore path to restore data from Cloud
Note
The restore path cannot be the same as Data Source Path.
Restore ACL
Specifies on-prem data upload and restore with ACL from the cloud.
Note
You need to grant sudo permission access to the user to Restore ACL successfully. If ACL is enabled, it requires more CPU and memory resource.
Sync Mode
Specifies is the sync is Auto or Manual.
Use toggle to change the sync mode.
Upload(Max)
Specifies the maximum threads for data upload to the cloud. By default the the value is 100.
Threads are multiple processes running concurrently to process multiple files upload at the same time.
50 threads ~ 250 Mbps and WAN Internet bandwidth dependency
You can iIncrease threads for higher bandwidth and reduce for lower bandwidth.
Max queue produce
Specifies Max queue produced per fetch from metadata. Queue refers to staging area for number of files preparing to upload to Cloud. There are no changes required in normal situation.
It will not be in the queue from 1,00,000 onwards.
Upload Part Size
Specifies the min part size in MB to divide into small files. Big files are split in small sizes of 5MB before they are uploaded.
Threadpool
Specifies the max number of multipart upload threads in the pool. Threads are multiple processes running concurrently to process multiple multipart files to upload at the same time.
Threshold
Specifies the min file size in MB to trigger the multipart upload. the default value is 10 MB. Large file size greater than 10MB are split into 5MB each before uploading
Restore Thread(max)
Specifies the max restore threads for data restoration from cloud to on-premise restore path. Threads are multiple processes running concurrently to process multiple files for restore at the same time.
50 threads ~ 250 Mbps and WAN Internet bandwidth dependency
Increase threads for bigger bandwidth and power CPU/RAM and reduce for lower bandwidth or having less CPU/RAM.
Sync Thread(max)
Specifies max Sync threads for data sync. Threads are multiple processes running concurrently to process multiple files scan and sync at the same time.
Increase threads if no Queue and having powerful CPU/RAM, reduce threads for high Queue or having less CPU/RAM.
In Data Mover Setting, change the Upload (Max) Threads and Restore ACL if required.
Upload (Max)Threads: Define the number based on your allocated site network bandwidth. Reference: 50 Threads ~ 250 Mbps.
Restore ACL (Access Control List): By default, it is disabled. Enable to upload/restore ACL to/from Lyve if required
Note
Requires more CPU/memory resources when enabling ACL.
Sync is set as Manual by default, you can set it to auto.
Manual Sync
Used for new Data Mover setup and verification.
Used for one-time sync for archived data (static in nature).
Auto sync
Used for continuous sync for all data, including new/modified files (dynamic in nature).
Data Mover Global Configuration
Open the Data Mover portal using http://PORTAL HOSTNAME/login using default credentials.
Username: admin
Password: 1q2w3E*
Note
Replace HTTP with HTTPS if the SSL certificate is enabled
Select System and then select Settings.
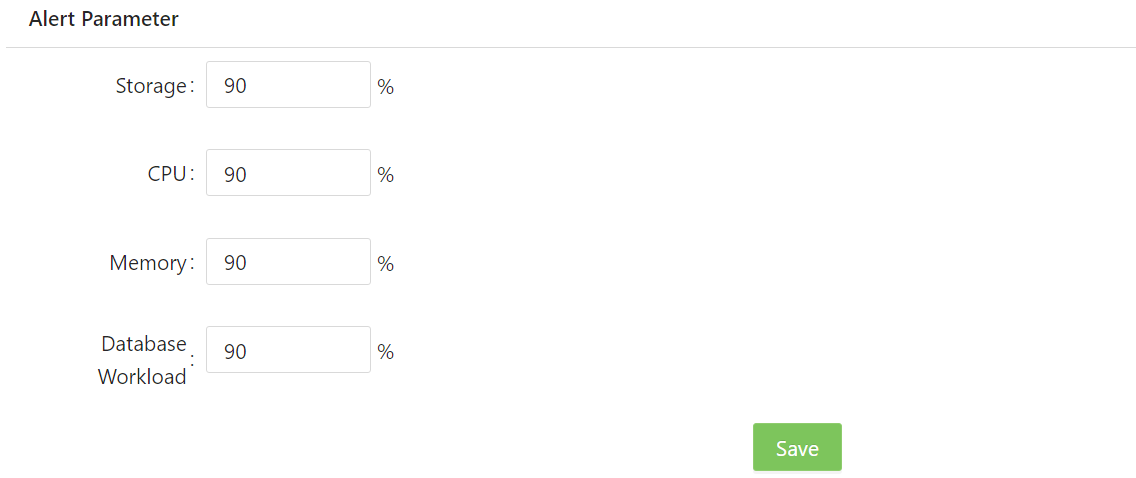
Configure the Alert parameter.
The default value is 90%, you need to consult the system administrator before changing the value.
Notification and log generated if actual system utilization exceeded the defined threshold %.
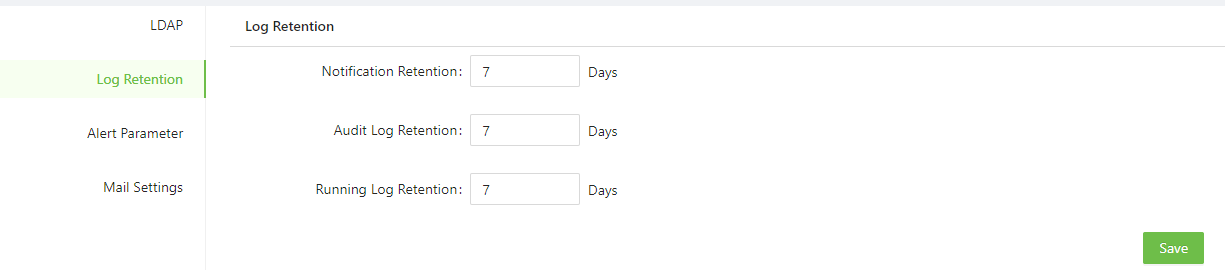
Configure Log Retention.
By default, the retention values are set to 7.
Edit the Notification Retention, Audit Log Purge, and Running Log Purge in the number of days.
Based on the number of days, the details are available in the respective section of Data Mover.
Configure Mail Settings.
Select System from the menu and then select Settings.
Select Mail Settings from the menu options displayed.

Enter the specific SMTP server details and the Receiver's list.
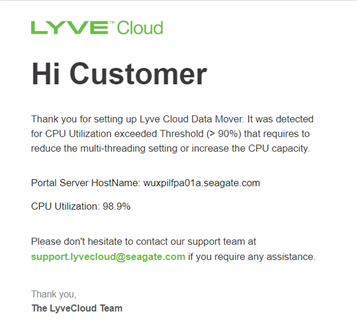
Automated email alerts are sent to the users in the Receiver list in the event of any of the Storage, CPU, Memory and Database utilization exceeded the defined threshold%
Following is a sample email.
Configure the LDAP for Read-only active directories to perform user authentication through AD.
Select System from the menu and then select Settings.
Select LDAP from the menu options displayed.
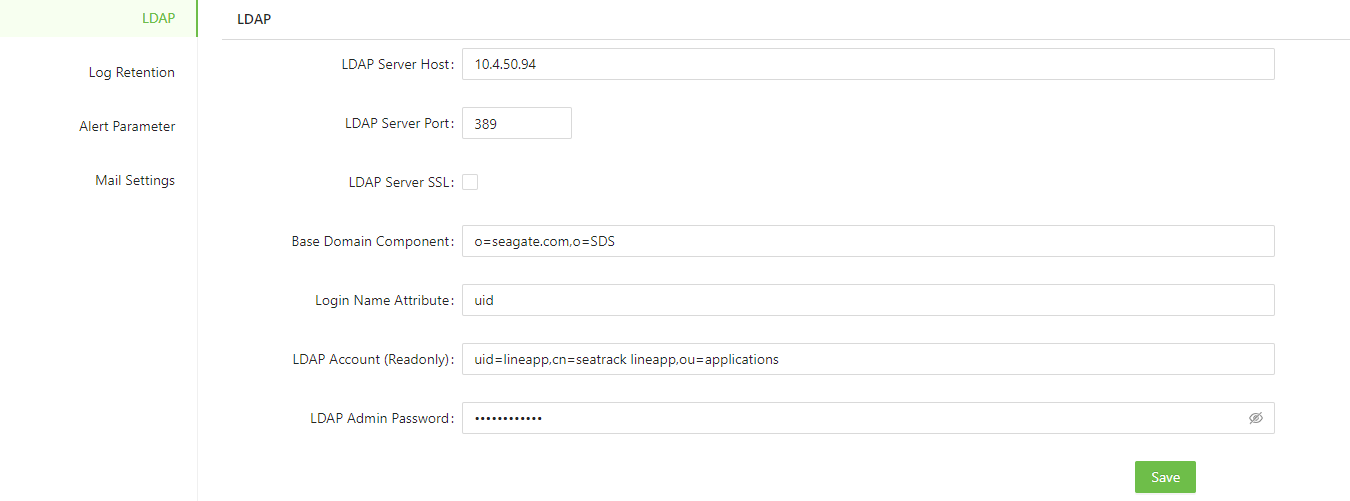
Enter the server details and select Save.
This enables you to add centralized user authentication for Data Mover.