Managing Users and Roles
The Users page allows you to create users and set user roles. A user is an individual customer who can perform various actions in the Lyve Cloud console based on the assigned role. A role restricts the actions a user may perform, which prevents unauthorized access to Lyve Cloud features.
About user roles
You can set distinct roles for Lyve Cloud users. These users can perform actions based on assigned roles, see Role-based access sections in the respective topics.
Administrator - An administrator can perform all the operations in the Lyve Cloud console.
Storage Administrator - The storage administrator can manage all storage-related actions that includes managing buckets, permissions and service accounts in Lyve Cloud.
Auditor - An auditor has read only access to the Lyve cloud console, and thus cannot perform any actions.
About user and authentication types
About user types
In Lyve Cloud, there are two distinct user types:
Password user: Users whose username and password are managed in Lyve Cloud
Federated user: Users who are authenticated via their organization's identity provider (IdP).
Note
Federated users only exist when SAML Federation is configured on the account.
About authentication types
Set an authentication type while creating a user. The following are the available authentication types for each of the user types.
Multi-factor authentication (MFA) is enabled by default for IAM users. Multi-Factor Authentication required two authentication methods:
Password: Set a password as the first factor of authentication. All IAM users must set a password. For more information, see Registration workflow for password authentication type.
A password policy is applied to all user accounts created and managed directly in Lyve Cloud. For more information, see Password policy.
OTP or SMS: Set SMS or OTP as the second authentication factor. For more information, see Using multi-factor authentication (MFA).
Federated users have the following authentication type:
Federated: This option is available only when configuring SAML Federation for the account. For more information, see Configuring Federated Login.
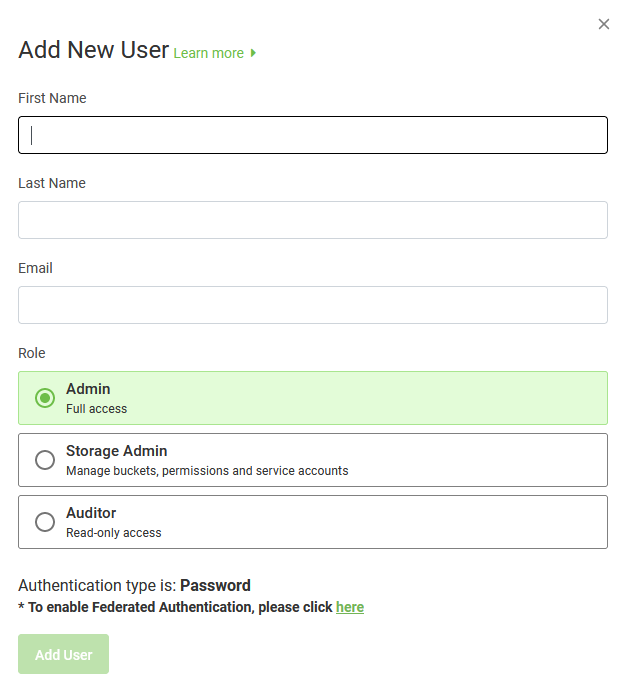
Adding a user
On the left-hand menu, select Users.
On the Users page, select Add User.
In the Add New User dialog box, enter the following and select Add User:
First Name: Enter the first name of the user.
Last Name: Enter the last name of the user.
Email: Enter the email address of the user.
Note
You cannot modify the email address after adding a user.
Role: Select from the options Admin, Storage Admin, Auditor.
Authentication Type:
If SAML Federation is not configured, no selection is required, and the following are possible display options:
Password
If SAML Federation is configured, no selection is required, and the following are possible display options:
Federated
Password
Select Add User.
An invitation email is sent to the IAM user to complete the registration process. For information, see Registering an IAM user in Lyve Cloud.
The following image displays the Add New User dialog box.
Registering an IAM user in Lyve Cloud
When an IAM user is registered in Lyve Cloud, the user receives an email invitation. They must register in Lyve Cloud by Multi-factor Authentication (MFA), a security method that is set by default for all accounts.
The following image displays a sample email invite. This email invitation link expires within 72 hours.
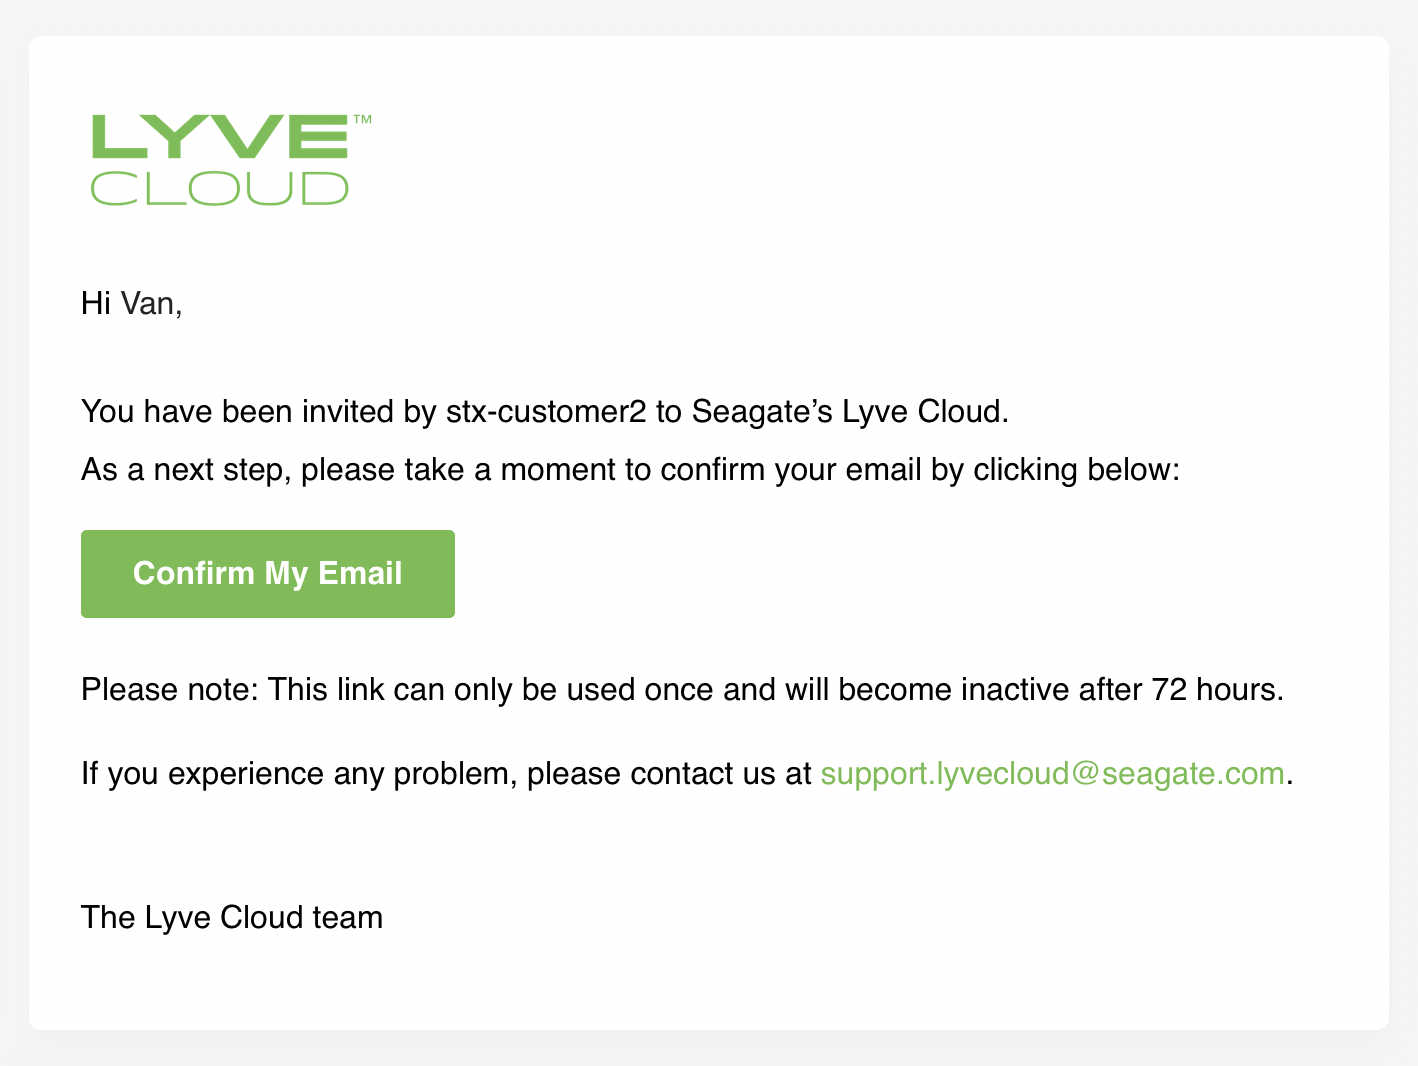
If the user doesn't select the link within 72 hours, they should select Forgot Password on the login page. For more information, see Registering after an email invitation link expires. Check your spam folder if you believe you did not receive an email invitation or contact the support team at support.lyveloud@seagate.com to complete the registration process.
Registration workflow for password authentication type
After the user is registered in Lyve Cloud and receives an email invitation, they should complete the registration.
Select the link provided in the invitation email to get started.
Enter Password and Confirm password in the Create Password dialog and select Create.
Note
Refer to the Password Policy while creating a new password.
Once a password is created, the user is taken to the Lyve Cloud Login page.
Registering after an email invitation link expires
To complete registration after an email invitation expires:
Select the Forgot Password link. This page appears after you select the Click on this link to get started link in the invitation mail.
Follow step 2 onwards from the Registration workflow for Password Authentication Type.
Viewing and editing a user
An administrator can change the first name, last name, and the assigned role of an IAM user. Only administrators can edit or redefine roles for users, they cannot edit or change roles defined for themselves. If a change to an administrator role is desired, a different administrator must make the change.
Note
Once a profile is edited, the respective user must log out of Lyve Cloud and log back in for role changes to take effect.
The following table describes the column names in the user's table.
Column Name | Description |
|---|---|
First Name | Displays the user's first name. |
Last Name | Displays the user's last name. |
Displays the user's email address. | |
Authentication Type | Displays the user's authentication type. For more information, see About MFA |
Role | Displays role of the selected user. About user roles. |
Status | Displays the user's status as either Enabled or Disabled. |
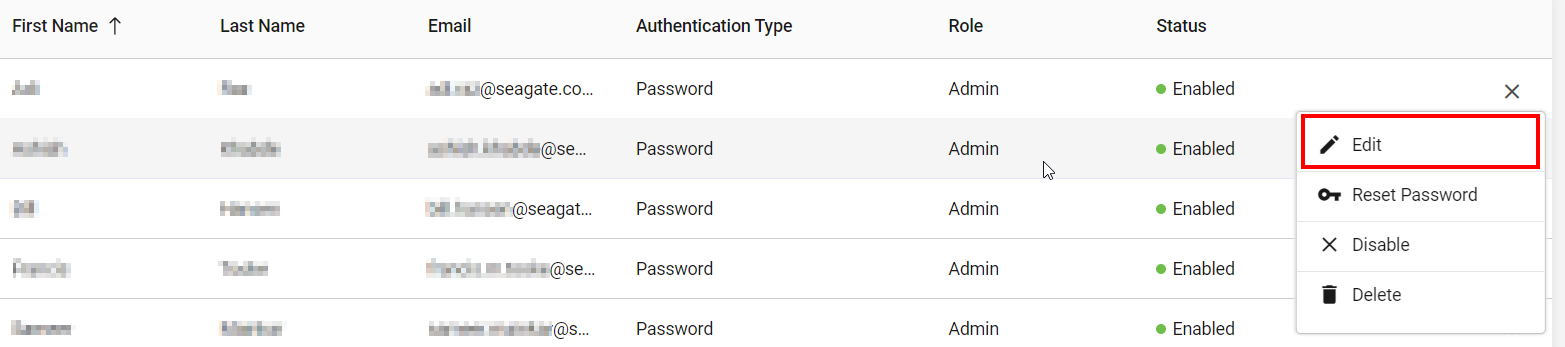
On the left-hand menu, select Users.
On the Users page, find the user you want to change.
Select the ellipses (...) in the right-most column of the user's role and select Edit.
In the Edit User dialog box, edit the following and select Save.
First Name: Enter the first name of the user.
Last Name: Enter the last name of the user.
Select a Role to modify from the following options
Admin
Storage Admin
Auditor
You can also see the Authentication Type of the user, which is read-only and not editable.
Note
While editing a user, you cannot modify the email address.
Disabling or enabling a user
On the Users page, select the ellipses against the user and select Disable or Enable.
Select the ellipsis and select Disable or Enable.
Select Yes, in the confirmation box to change the status.
Deleting a user
On the left-hand menu, select Users.
On the Users page, find the user you want to change.
Select the ellipsis and select Delete.
Select Yes in the confirmation to change the status.
Resetting password
On the left-hand menu, select Users.
On the Users page, a list of users is displayed.
Select the eclipses and then select Reset Password.
Select Yes to reset the password.