Managing bucket access permissions
Permissions are used to control access to buckets and define which actions the service accounts are allowed for a bucket. Bucket permission and Policy permission are two options available for granting permission to your buckets.
Bucket permission: Bucket permission is used to set Read only, Write only, or All operations permission for selected buckets. Using Bucket permission, you can grant access permissions to your bucket and the objects in the bucket. Only the admin and storage admin can associate permissions for the buckets. The permissions attached to the bucket apply to all of the objects in the bucket. For more information, see Creating bucket permission.
Policy permission: Policy permission is used for creating policy permission by uploading a JSON file. You can also import a file which is compatible with the AWS IAM policy file. Using the Policy permission, you can allow or deny requests at a granular level based on the elements in the policy, resources, and aspects or conditions of the request. For more information, see Creating policy permission.
Role-based access to permission management
The following table describes access to permission management features based on your role.
Actions | Admin | Storage Admin | Auditor (Read only) |
|---|---|---|---|
Create permission | ✓ | ✓ | × |
Edit | ✓ | ✓ | × |
Delete | ✓ | ✓ | × |
Status | ✓ | ✓ | × |
List and view | ✓ | ✓ | ✓ |
Creating bucket access permissions
You can create bucket permissions without any buckets in the account only if you apply permission to all buckets in the account or all buckets with a prefix.
On the left-hand menu, select Permissions.
On the Permissions page, select Create bucket permission.
On the Create bucket permission dialog, enter the following:
Name: Enter a name for the permission.
Which buckets does this permission apply to?: Select any one from the following:
One or more existing buckets: Choose one or more buckets from the Buckets list.
Buckets: The buckets field is displayed on when you select One or more existing buckets.
All buckets in this account with a prefix:
The bucket names must use the same few initial characters. For example, if four unique buckets for customer01 are created, such as customer01rawdata, customer01zipdata, customer01media and customer01, enter a prefix of the bucket names to assign and apply the permission. In this case, use the same beginning characters for each bucket for our prefix, customer01.
Note
Only one prefix is allowed for a single permission.
The prefix field allows a maximum of 64 characters.
All buckets in the account: Apply permission to all current and future buckets in the account.
Actions: Select actions to assign privileges as:
All Operations: Allows all operations in all buckets meeting the conditions defined under Which buckets this permission applies to?.
Read only: This option allows you to perform a read only operation on one or more selected buckets and its objects.
Write only: This option allows you to write objects into the selected buckets without reading them back.
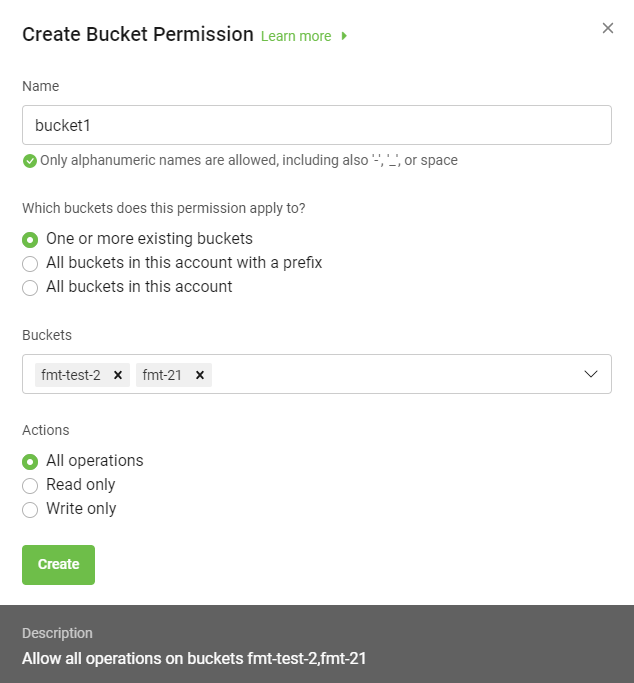
Once you select the desired options, the description of the permissions is displayed for that bucket permission.
Select Create to save the permission for a bucket.
The permissions list page displays all permissions. To manage permissions, see Editing bucket permissions and Deleting bucket permissions.
Creating a policy permission
Lyve Cloud allows the migration of AWS IAM policy files to the Lyve Cloud policy permission, making it simple to start working with service accounts based on existing policies. A policy file uses a JSON file format that is compatible with an AWS IAM policy.
Working with policy files allows you to specify the Condition element. Query the exact request values to determine when a policy is in effect, or list specific actions such as, Action: ["s3:GetObject","s3:PuObject"] and specify the Resource element for several buckets and objects. For more information, see Example of policy permission file.
How to get an IAM policy file from AWS?
You must manually copy policy permission details from AWS IAM policy to use in Lyve Cloud:
Login to AWS Management Console using the credentials.
Select Services on the top left to view the list of services.
Select IAM in Security, Identity, & Compliance.
Under Access Management, select Policies and use the Search field to find the relevant policy to copy the policy details.
Select the JSON tab, copy the policy details into a new file, and then save it as a JSON file.
Using a policy permission file
The following table lists the mandatory, optional, and invalid elements in a policy permission file.
Note
Invalid elements must be removed from the file before importing, as these elements are not used in the Lyve Cloud policy permission file.
Remove tags from elements available in AWS IAM policy, as tags cannot be used in the policy permission file.
Elements | Mandatory/Optional/Invalid | Description |
|---|---|---|
Statement | Mandatory | Contains a single statement or an array of individual statements. |
Resource | Mandatory | Specifies object(s) or bucket(s) that is related to the statement. |
Effect | Mandatory | Allows or denies access to the resource. |
Action | Mandatory | Describes specific action(s) that will be allowed or denied. |
Version | Mandatory | It defines the version of the policy language and specifies the language syntax rules that are to be used to process a policy file. |
Condition | Optional | Allows you to specify conditions when a policy is in effect. The Condition element includes expressions that match the condition keys and values in the policy file against keys and values in the request. Specifying invalid condition keys returns an error. For more information, see Known Issues. |
Sid | Optional | A statement ID. The statement ID must be unique when assigned to statements in the statement array. This value is used as sub ID for policy document's ID. |
Id | Optional | A policy identifier, such as UUID (GUID). |
Principal | Invalid | Specifies the service account that is allowed or denied to access a resource. |
NotPrincipal | Invalid | The service accounts that are not specified, are allowed or denied access to the resource. |
NotAction | Invalid | Specifies that it matches everything except the specified list of actions. If this element is part of the permission file, you need to replace it with the |
NotResource | Invalid | Specifies that it matches every resource except the available specified list. If this element is part of the permission file, you need to replace it with the resource element. |
Example of policy permission file
In the following example, the policy permission has three statements:
Statement1: Allows object listing with a prefixDavidin the bucketmybucket. It is done using a Condition element.Statement2: Allows read and write operations for objects with the prefixDavidin bucketmybucket.Statement3: Denies delete object operation for two resources:All the objects in
mybucket/David/*All the objects in
mycorporatebucket/share/marketing/*{ "Version": "2012-10-17", "Statement": [ { "Sid": "statement1", "Action": ["s3:ListBucket"], "Effect": "Allow", "Resource": ["arn:aws:s3:::mybucket"], "Condition": {"StringLike": {"s3:prefix": ["David/*"]}} }, { "Sid": "statement2", "Action": [ "s3:GetObject", "s3:PutObject" ], "Effect": "Allow", "Resource": ["arn:aws:s3:::mybucket/David/*"] }, { "Sid": "statement3", "Action": ["s3:DeleteObject"], "Effect": "Deny", "Resource": ["arn:aws:s3:::mybucket/David/*", "arn:aws:s3:::mycorporatebucket/share/marketing/*"] } ] }
Use the following policy to limit the bucket access to specific IP's:
{  "Version": "2012-10-17",
   "Statement": [
    {
         "Sid": "Sid-1",
         "Action": ["s3:*"],
         "Effect": "Deny",
         "Resource": ["arn:aws:s3:::mybucket"],
         "Condition": {"NotIpAddress": {"aws:SourceIp": ["134.204.220.36/32"]}}
    },
    {
     "Sid": "Sid-2",
     "Action": [
      "s3:*"
    ],
      "Effect": "Allow",
      "Resource": ["arn:aws:s3:::mybucket", "arn:aws:s3:::mybucket/*"]
    }
   ]
}
On the left-hand menu, select Permissions.
On the Permissions page, select Create Policy Permission.
On the Create Policy Permission dialog:
Enter a Name.
Displays a Description for the permission. You can also edit the description.
Drag and drop a policy permission file, or browse to upload a file.
Once the new policy permission file is available, download or replace the existing file.
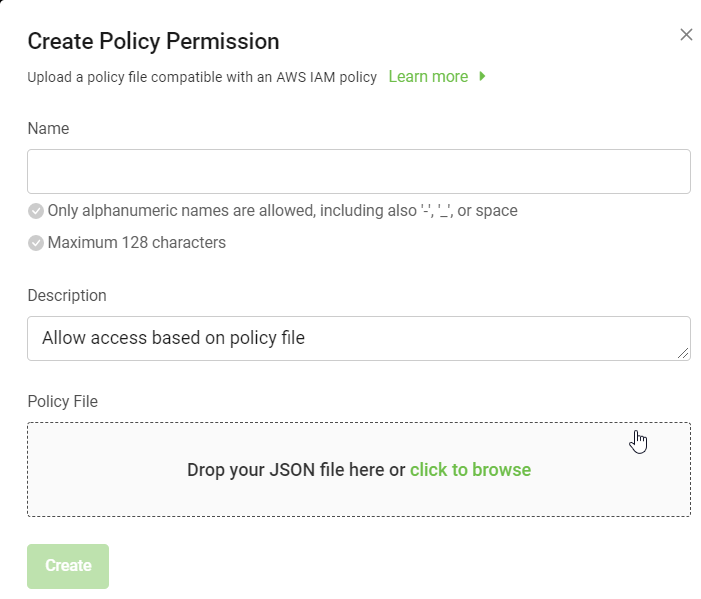
Select Create.
You might encounter errors if the policy permission file (JSON) has any additional or missing elements. The following is the list of possible error messages. Read them carefully and update the policy permission file accordingly.
Error Message | Resolution |
|---|---|
File Import Failed: Invalid JSON file. | Check the JSON file structure. |
File Import Failed: Effect field is required. | Add this element to the policy permission file. |
File Import Failed: Resource field is required. | |
File Import Failed: Action field is required. | |
File Import Failed: Statement is required. | |
File Import Failed: Version field value is empty. | Add a value to this element. |
File Import Failed: Action canot be empty. | |
File Import Failed: Resource canot be empty. | |
File Import Failed: Condition canot be empty. | |
File Import Failed: Effect value is invalid. | Add a valid value to this element. |
File Import Failed: Action value < action> is not valid. | |
File Import Failed: Resource value < resource> is not valid. | |
File Import Failed: Condition name is not valid: <condition entered> . | Choose a valid condition name, such as |
File Import Failed: Condition key is not valid: <condition key entered> . | Choose a valid condition key, such as |
Editing bucket permissions
Edit existing permissions to change selected buckets and their associated actions.
On the left-hand menu, select Permissions.
On the Permissions page, select the ellipsis of the permission to modify, and select Edit.
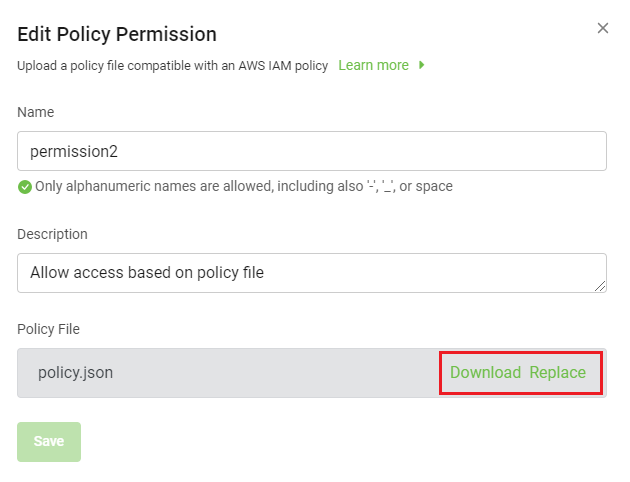
To modify Policy Permission-type permissions:
In the Edit Policy Permission dialog, edit the following:
Name
Description
Policy File: download or replace the existing file.
To modify Bucket Permission-type permissions:
In the Edit Bucket Permission dialog, edit the following:
Name
Which buckets this permission applies to?
Actions
Select Save.
These changes take effect as soon as the updated permission is saved, and any subsequent application API calls will be affected.
Deleting bucket permissions
Note
Permissions used by any service accounts cannot be deleted.
In the menu, select Permissions.
On the Permissions page, select the ellipsis (...)
Select Delete, and select OK in the confirmation.
After you delete a permission, you cannot restore. However, you can create a new permission and reuse that permission name.
Viewing permissions
By default, the Permissions page displays 10 permissions at a time. You can sort the columns in the table.
In the left-hand navigation, select Permissions.

The following table describes the columns used to list permissions.
Column Name
Description
Name
Displays name of the permission.
Description
Displays the permission description.
Type
Displays the type of permission created. The type can be Policy permission and Bucket permission.
Service Accounts
Displays the number of service accounts using that specific permission. You can hover the mouse on the number to view the names of the attached service account and the question mark icon to view the tooltip.
Creation On
Displays the date and time when the permission was created in the year, day, month YY:DD:MM AM/PM format.
Select the arrow next to Rows per page to change the number of permissions to list per page.